Tutorial Project 2: MusicBox
Still under construcion: Rework of the Music Box Tutorial
- Outline: Vsti with:
- 4 switchable Samplemaps
- Filmstrip Interface
- Panel Navigation
- Sample Modulation
- Velocity Modulation
- Modwheel, Release Trigger, NoteOff/Ringing
- Colored Keyrange + Key Trigger
- Save/Load Presets in Preset Browser

This tutorial will guide you through the process of building a simple sample library and export it as VST / AU plugin. The following topics are covered:
- Part 1: Application overview and Project setup
- Part 2: Sample Mapping
- Part 3: Adding effects and modulators & Add some custom MIDI processing scripts
- Part 4: Design the interface using scripting
- Part 5: Export the patch as plugin
The sample library will have these features:
- small sample set of a music box
- a basic reverb with additional predelay parameter
- A synthesised mallet click sound that can be added to the samples.
- modwheel controlled decay time
- release samples
- a custom interface that controls some selected parameters.
The interface and the samples are kindly provided by Wavesfactory
You can find the finished project repository here , so if you get stuck somewhere or are too impatient to crawl through the whole tutorial, simply clone this repository and check out the final result.
Before we start, let's take a look at the interface of HISE.
Part 2
We'll be using samples with well-formatted file names, that means that the mapping information can be fully extracted from the names without having to use the mapping editor.
There are a multitude of ways to map audio files in the sampler, from drag 'n drop to batch processing via regex commands. However I strongly recommend using a strict file naming scheme. There is a powerful file name parser in HISE which allows to map the samples automatically so if you do it right, you'll never have to touch the mapping editor ever.
You can download a sample set ready to be imported into HISE here:
For the sake of simplicity, extract and copy all samples you want to import into the Samples
subfolder of the new project (you can also opt to redirect the sample folder to another location, which is useful if you have a large sample library on another hard disk).
You need to create a sampler module that the samples will be imported to. Click on the +
icon next to the "Master Chain" label and select "Sampler".
You can use multiple sampler modules within one patch (and for more complex projects it is obligatory to do so). However for our little tutorial, one sampler should be enough (we'll be adding some synths later too).
As with HISE 1.0.0, there is a dedicated workspace when working with samplers. You can switch to this workspace by pressing the !Workspace button on the Sampler you've just created (this also works for script processors, but that will be covered later on). This should switch to this view:

There are 4 main panels:
There's also the Sample Pool Table which shows all samples loaded into HISE, but it's not important for now...
Drag samples into the map editor
You should already be in the project folder. Double click on the 'Samples' folder, select all samples (Cmd / Strg + A
) and drag them into the map of the sampler. Select "Filename Token Parser" and press OK".
Use the file import dialog to extract the mapping information
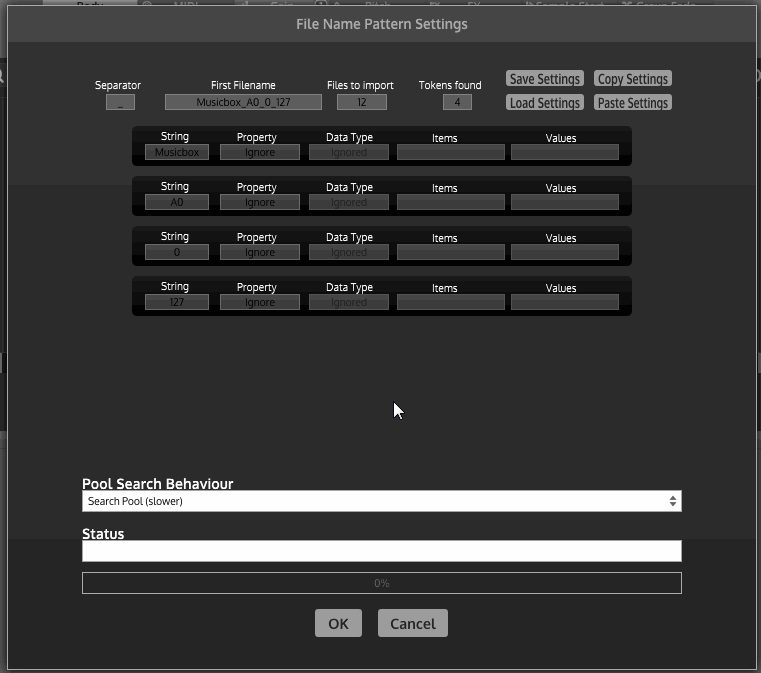
Before we setup the right settings in the next window, let's take a look at one filename:
Musicbox_A0_0_127.wav
1 2 3 4- The instrument name (and can be ignored for mapping)
- The note name which will be used for mapping
- The low velocity limit
- And the high velocity limit
The filename is split into tokens which are vertically arranged and can be assigned to different mapping properties. Select these properties for each token:
- Ignore
- Single Key
- Low Velocity
- High Velocity
and press OK:
For a detailed explanation of the file import dialog, please refer to the chapter in the Reference Manual .
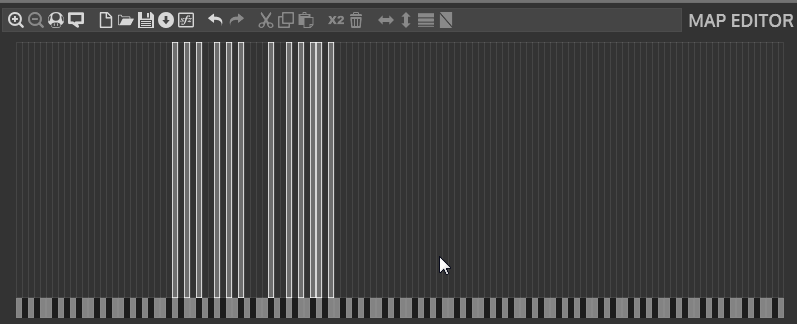
Fix the mapping
In a ideal world, you could start playing now with the samples and proceed to the next part. However the current mapping has two issues:
- There are gaps between notes because it is not chromatically sampled.
- The note names are off by two octaves
So we need to get our hands a little dirty and fix those issues manually in the sample map editor. To fix the gaps, select all samples by dragging the lasso and click on the "Close vertical gaps icon".
To fix the octave offset, press and hold down the Alt
key (that the cursor changes to the hand) and move the selection two octaves up):
Afterwards you should save your current Samplemap via the Save-Button(Floppy Disk) or with Ctrl+S
. It will now reside in your projects SampleMaps
folder as an .xml file.
Export as HLAC monolith
HISE has a custom lossless audio codec that is heavily optimized on decoding performance (which is about 10x as fast as FLAC). You can use this codec and collect all your sample files into one monolithic audio file by exporting the current SampleMap. Press the !Monolith button to open this dialog:

Choose Low file size and enter a name for the sample map. Press OK - and ignore the error message that will popup :)
Now you should have a .xml file in your SampleMaps
directory and a monolith file with the extension ch1
in the Samples directory (if you export multi mic samples, they will have the extension ch2
, ...). The file size went down from 12MB to 4MB.
If you have multiple sample sets, you can export each one as dedicated sample map and use scripting callbacks to switch between these samples.
That's it. You now have a perfectly mapped sample set ready to be played. In the next chapters we will add some modulators and effects to the patch.
Part 3
Build the patch
Now that we've successfully mapped the samples, we can start adding modulators and effects to shape the instrument sound - and finally bring some colour to the patch. By doing this we can look into the most important areas of HISE (after the Sampler, of course): Modulators , Scripting , Synthesis & Effects .
This tutorial is a practical guide. For detailed information you can look up the chapter in the manual, I added links for further reading where available.
1. Modulators
Modulators create a signal from 0 ... 1
which can be used to dynamically change the parameters of a HISE patch (the range will be converted depending on the modulation target). They are a key feature to add dynamic behaviour to a sampled instrument so let's start with that.
If you want to know more about the three main modulation types, check out this chapter of the manual.
Gain Modulation
Let's add a Velocity Modulator
to control the volume of our sampler module. The Modulator Chains
can be hidden and shown using the button bar below the header of each module. Click on the Gain
button below the Sampler module's header and choose Voice Start Modulator -> Velocity Modulator
.

The gain of each voice is now controlled by the velocity of the incoming note on message. You can define a function that changes the behaviour by clicking on Use Table to adjust the curve:
- Click anywhere to add a new point
- Drag points around
- Right click on a point to delete it
- Ctrl + Mousewheel over a point to change the curve on its left side.
The x-axis will be the input (normalized from the MIDI velocity values 0 - 127) and the y-axis is the resulting modulation value from 0 to 1, which in the case of gain modulation is simply used as gain factor (unless you activate Decibel Mode
). The default behaviour is linear (= a value of 0.5 is only a 6dB attenuation), so we might want to adjust the curve to make it more "musical". Hover over the right point and Ctrl + Mousewheel down
until you have a exponential type curve:
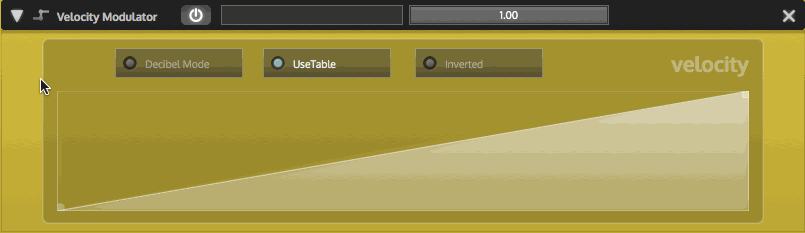
When you play a note you'll see a horizontal ruler indicating the last x position. You can see the modulation value of each modulator (as well as the combined result) at the horizontal bar in the headers of the modulators (and the parent modulator chain). Next to the bar is the intensity slider of every modulator which can be used to change its impact on the resulting modulation value (a intensity of 0.0 means no influence and 1.00 is a plain multiplication.
Before we continue, let's rename this modulator. Each module in a HISE patch should have a unique name (that's how they can be accessed via scripting), so let's keep things tidy. Click on the Velocity Modulator label on the header, and give it a new name (either "Sampler Gain Velocity" or "Joffrey")
Sample Start Modulation
In the real world different dynamic ranges have a lot more differences than just volume. A neat trick for mallet type sounds is to alter the start of the sample for softer notes by truncating the sample attack phase.
This can be achieved by modulating the sample start depending on the velocity. However this behaviour will increase the memory usage, because the whole area that is modulated needs to be prebuffered, so its deactivated by default. But to achieve our softened attack we will now activate it, shift the Sample Start, and afterwards modulate the attack with another Velocity Table. Open the sampler (and its sample editor panel), select all sounds, and set the SampleStartMod
value to 800:
The sample start is set to the end of the modulated area, so if you press a key, you should hear that the attack phase of the sample is skipped. This is because the default modulation value of 1.0 is used until a modulator is added to the sample start chain. So let's add another velocity modulator there. Instead of creating a new one (as seen above) we can also just copy & paste our previous Velocity Modulator.
Everything in HISE that is copy & pasteable (tables, scripts, modules) has a green outline when selected so make sure the velocity modulator has the focus (by clicking somewhere on it).
Press 'Cmd + C' ('Ctrl+C' on Windows). The module is now pasted to the clipboard. Every modulator is saved as a simple XML string (we'll get back to this later on), so if you're curious, paste it into a text editor and see what goes on behind the scenes. Now activate the Sample Start button in the SAMPLER Ribbon, and select the (now visible) new (green) chain slot at the end of our Sampler chain (this is our paste target). Press 'Cmd+V' ('Ctrl+V') and it should paste the other modulator in the new chain. It's now called "Joffrey 2" , so let's give him a better name.
You'll notice the different colours of the modulators. Their layout is always the same, it will have different colours depending on their modulation target so you can quickly get a idea of what they are doing.
The new modulator should now alter the start position of the sample so that a modulation value of 1 means a start offset of 800 (you can define different offset ranges for each sample, but in our case all samples are set to 800). However, we want a inverted behaviour (soft notes should skip the attack phase). Therefore we need to invert the modulator (by activating the "Inverted" button). It still sounds a bit artificial (we'll do something about that later) but it should work as expected now.
Pitch Modulation
Let's take a look at another modulation target type as it has some note-worthy differences.Open the Pitch Chain
and insert a Voice Start Modulator -> Constant Modulator
. Change the intensity to -12 st
. Now everything will be played back an octave lower (which makes it sound more like a Celesta).
Notice how the intensity for pitch modulators changes from 0..1
to -12 ... 12
(by clicking on it, you can enter a exact pitch intensity). There is also another button (between the modulation bar and the intensity slider) which toggles bipolar mode:
| What | Bipolar Mode | Unipolar Mode |
| Icon | 
|

|
| Input | 0...1
|
0...1
|
| Zero input value | 0.5
|
0.0
|
| Output | -intensity ... +intensity|
0 ... +intensity |
|
**Use for** | Vibrato, Pitchbend, ... | Envelopes | |
For this example it makes no difference; a constant modulator always returns 1.0, but there are some use cases which require a certain mode.
This concludes our introduction to **Modulators**. A tutorial for **HISE** would not be complete without a introduction into scripting so let's continue with a script that processes the incoming MIDI messages.
2. Scripting
There is a huge amount of possibilites with scripting in **HISE** (you can even create you own audio effects and modulators with it), but MIDI event processing is where scripting really shines because it allows a maximal amount of flexibility with reasonable performance impact compared to native code.
We want to control the maximum velocity amount with the mod wheel so when the mod wheel is at mid position, hitting the keys hard gives us velocities < 64.
Also we want to control the amount of this attenuation by a interface knob (so when the knob is all the way left, the behaviour is unchanged and like described when the knob is all the way to the right).
This feature is pretty random, but it allows us to peak into the most important parts of script development such as *Callbacks*, *API calls* & *Cross script communication*.
Every sound generator (including the **Master Container**) has a slot for script processors. This is a major difference compared to other sampler platforms, which only have a global slot for scripts and allows a greater encapsulation and enforces a 'one script per task' design.
Nevertheless, we'll want to scale the velocity for all sound generators in the patch, so we need to add a **Script Processor** in the **MIDI** slot of the **Container**.
Let's take a closer look at this module:
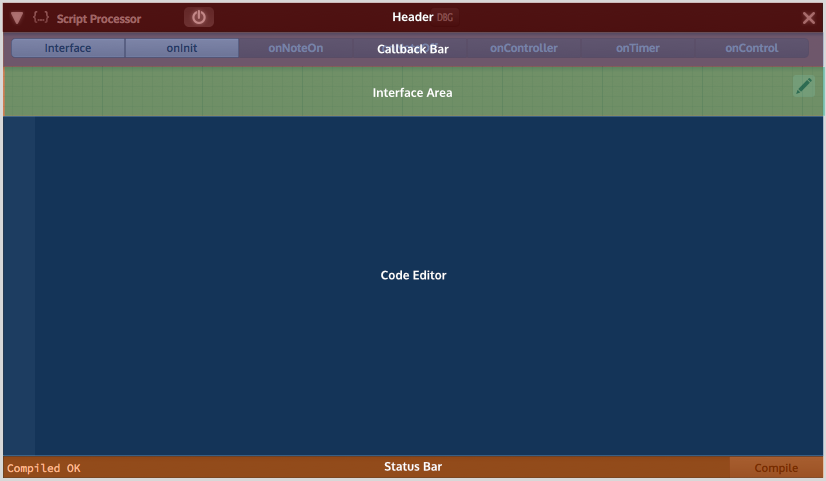
Initialise all variables
Below the header of the script processor there is the callback bar that can be used to switch between different callbacks. Select the onInit callback (which should be the default already) and add these lines:
// This adds a knob to the script interface
const var amount = Content.addKnob("amount");

// This will store the current normalized mod value.
reg modWheelGain = 1.0;

// This will store the current velocity
reg currentVelocity = 127.0;
If you do know Javascript a little you might be puzzled about the keyword reg. This is a custom variable storage type (inspired by the old school
register keyword from C / C++) that allows faster (and thread safe) access than the standard
var keyword. The
var type is left unchanged for standard Javascript compatibility. For working variables I would always recommend using this variable type. The
const keyword does not mean that you can't change the knob, but that the variable will not be assigned to anything else (this vastly increases performance of calling API methods). It is good practice to declare all interface widgets or connected modules as
const.
Click on the **Compile** button (or press **F5**) and it will compile the script. You should know see a knob named *amount* and a comforting "Compiled OK" message in the status bar.
Adding the callback code
Now we need to add code in the callbacks that implement the functionality. Open the onController callback editor and add these lines into the given function:
if(Message.getControllerNumber() == 1)
	{
		modWheelGain = Message.getControllerValue() / 127.0;
	}
This code checks if the incoming CC message is a modwheel message (Nr. 1) and then stores the value in the previously defined variable modWheelGain.
If you press **Escape** while typing, you'll get a nice autocomplete popup with all API methods and defined variables. There is also a complete list of every Javascript API function on the left panel (right click on a function for a popup with more information).
Now we need to change the velocity using the modWheelGain variable and the value of the
amount knob.
This formula will be used:
output = (amount * input * modwheelGain) + ((1.0 - amount) * input)These lines have to be added to the onNoteOn callback. We'll be using the working variable
currentVelocity for it:
function onNoteOn()
{
	currentVelocity = amount.getValue() * Message.getVelocity() * modWheelGain +
    				  (1.0 - amount.getValue()) * Message.getVelocity();

    Message.setVelocity(currentVelocity);
}
If you click on the DBG button of the script processor, it will open a live watch table which displays all current variables including their current value. If a value changes, it will be marked red for a short time. This is a neat way to check the correct script functionality (the
currentVelocity variable should be a value between 0 and 127);
Press Compile (or F5) and check if the script works as expected: move the modwheel and increase the amount value and see if the velocity is modified accordingly.
That's it. You created your first script. The next steps would be learning Javascript (the basics are extremely easy and the complex stuff is not really needed in **HISE**) and get to know the **HISE Javascript API**.
As a last step in the instrument design process we'll be adding some synthesisers to enrich the sound (**HISE** was designed to make hybrid sample libraries as easy as possible).
3. Synthesis
The sample set we are using here is rather simple. If we had unlimited resources and time, we probably would have recorded multiple velocity layers, different round robin variations (maybe more mic positions) and a release sample set.
However, creating sample libraries is always a tradeoff of recording effort (and sample amount) vs. a expressively playable instrument and **HISE** has some features that help us to add expressiveness without additional samples. This chapter is not necessary for getting a basic overview of HISE, but I added it anyhow because I think there are many interesting use cases which people that are coming from a sampler-only platform might not know about.
We'll be adding two sound generators with the following purposes :
- Simulate the muted ring-off sound by adding a decaying sine wave generator that is triggered on release
- A short filtered noise click that simulates the sound of the mallets hitting the bars (and masks the truncated sample start).
You can add as many different sound generators as your CPU can handle. They are completely independant from each other, so I'd recommend using multiple samplers for different sample types.
The muted ring-off sound
If you dampen the bars of the real instrument with the mallet, it will decay faster with a muted sound (the harmonics decay much faster than the root note). We can simulate something like this with a single decaying sine wave that is played when the keys are released.
So We'll leave the sampler alone (you might want to fold it by clicking on the triangle icon) and add a sine generator into the master container (the same way you added the sampler). Be careful, the sine wave generator is pretty loud compared to the samples!
We could implement the release trigger behaviour by another script processor, but there is a ready made module just for this purpose. Open the **MIDI** chain of the **Sine Wave Generator** and choose **Hardcoded Scripts -> Release Trigger**.
Don't bother about the parameters (for now). It should be already doing what we want. However if you now press a key now, you will get a infinitely ringing sine wave because there is nothing that stops the note triggered by the note off message. **Booh!** There are two ways of solving this. This is a common problem when developing scripts, so better get acquainted with the solutions:
- Press the power button of the stuck sound generator twice. When a sound generator is unbypassed, it will kill all voices.
- Press the MIDI panic button (the little !
symbol) at the status bar on top of the window. This is a little bit more graceful, because it won't cause clicks.
But let's add a envelope to get rid of this problem - pressing the panic button after each note can't be the solution...
Open the **Gain** chain, delete the **Default Envelope** by pressing the X symbol on its header (it is not useful for our purpose because it just adds a fade at the start / stop of the note) and choose **Envelopes -> AHDSR Envelope**. Set the sustain value to
-100 dB and increase the decay value until you have the sound that you need (I'd recommend something between 500ms and 2s). Also increase the attack time a little bit (to 100ms) to smooth the transition.
If you take a look at the voice counter (next to the panic button), you'll see that whenever a envelope reaches silence, the voice will be killed (otherwise you would stack up silent notes and increase CPU usage). However this only works when they are added to the **Gain** chain.
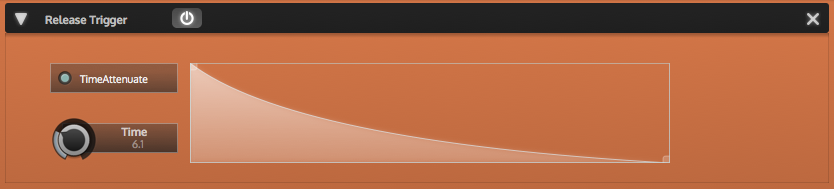
Now there is one problem: if you hold notes for a longer time, the release sample still has the same volume and produces a noticable volume bump. Fortunately, we can set up the **Release Trigger** Module to attenuate the velocity of the sound depending on the length of the note. Enable the **TimeAttenuation** knob, set the time value to something like 6(seconds) and change the table to a decaying function:
While it has now a decreased velocity for longer notes, it still won't attenuate nothing, because we haven't added a velocity modulator to the **Sine Wave Generator** yet. If you got so far in this tutorial, you should be familiar with the procedure...
If you think: "Wow that's redundant, why can't I add one velocity mod to the container instead of every sound generator" please be aware that containers are not polyphonically rendered and don't process MIDI messages individually (That's why MIDI based modulators are greyed out if you try to add them). There is a solution that allows coallescating modulators (it's called the *Global Modulator System*). Check out this blog entry for a detailed description.
You can fine tune all parameters (release decay time, release volume, fade time, etc) to create perfectly balanced transitions. You'll notice when you change one parameter, the other ones need readjustment, so don't get yourself lost in there (knowing how to balance this and knowing when to stop are the most difficult parts of instrument design).
The Attack Phase
When the mallet hits the bar it produces a non harmonic click noise which can be pretty noticable depending on the microphone positioning. From a musical perspective, enforcing this sound makes it more suitable for percussive playing styles.
We'll be recreating this effect by adding a filtered noise generator with a fast decay time. We'll be randomly modulating the filter frequency to remove the machine gun effect.
Let's skip the part where you need to add every module and set it's parameter. Instead copy this XML into your clipboard:
Add the finished module to the master chain - press the + symbol and choose **Add Mallet Click from Clipboard**. You are of course free to play around with the sound and change the parameters.
At some point in the future you might find out that some tasks are quicker done by exporting the patch as XML using a text editor to do batch changes and reimport the modified XML (eg. fixing sample location references or batch module renaming). Also, there is a dedicated function for pasting whole patches as encrypted string which is better pasteable into web sites (**File -> Export as web snippet** and **File -> Replace with clipboard content**).
4. Effects
As last step in the instrument design, we'll add some effects to the patch. There is a simple reverb algorithm effect that we will use. However it has no **Predelay** parameter, so we need to get creative. The multichannel system of HISE can be used to build Send FX routings. By creating a send FX channel for the reverb and adding a **SimpleGain** effect (which has a delay parameter), we can simulate the **Predelay** parameter.
First we need to change the channel amount of the patch to 4 (the default is 2 but we need 2 channels for the send FX). Press on the **Routing Button** of the Master Chain (the icon between level meter and volume slider) and choose 4 channels (via right click menu). Don't forget to connect all channels to the stereo output (there's also a shortcut *All Channels to Stereo* for this in the context menu).
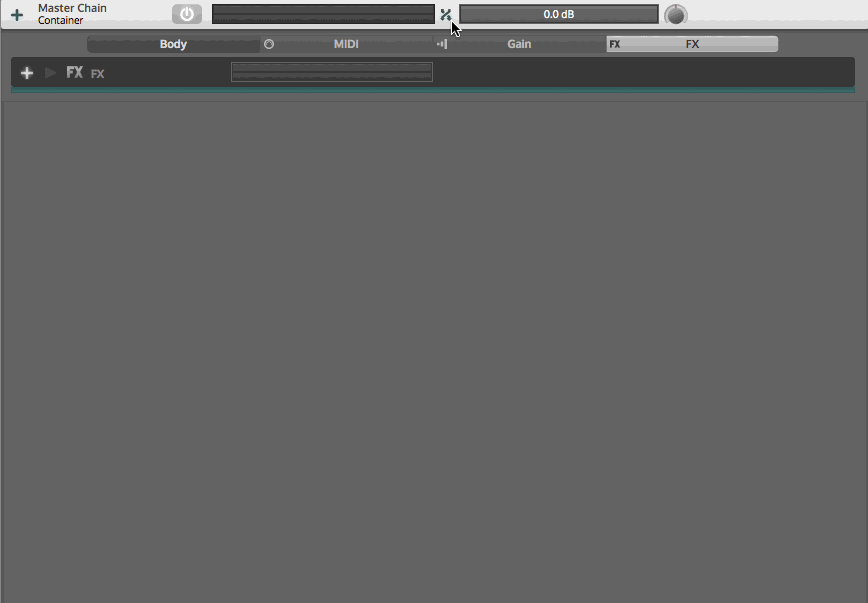
Now add these three effects in this order to the Master Chain's FX slot:
- **Routing Matrix** - copies the channels 1/2 to 3/4
- **SimpleGain** - controls the gain and the delay of the channels 3/4
- **SimpleReverb** - applies the reverb effect on 3/4
Shift click on the first two routing source nodes and connect them to the last two destination nodes (it should have a blue cable). Then set the processed channel's of the other two effects to the second pair. Since this is rather complicated, here is everything in time-lapse:
Set the wet amount of the reverb to 100% (we'll be controlling the reverb level with the gain parameter from the SimpleGain effect. You can leave the other parameters alone (the rest will get implemented when we build the interface in the next chapter).
In the next chapter we'll build the interface for the instrument. But before we do this, let's rename all modules we'll be addressing from the interface to make it more clear:
- Rename the Simple Gain module to "ReverbSendGain"
- Rename the Sampler module to "Musicbox Samples"
- Rename the Sine Wave Generator to "Ring Off Sound"
As last step, let's save the patch. Basically there are two file types: .hip files which are a binary format or XML files. If you want to use a version control system, I'd highly recommend using the latter one (it will also save all script as separate files automatically). Rename the Master Chain to "MusicBox" and choose **File->Save File As XML Backup**. Enter the filename in the dialog (*MusicBox.xml*), and press OK a few times (it will ask if it should export the scripts into separate files while saving and remove the view data). You should now have a .xml file in the XmlPresetBackup subfolder of the project.
The other .hip file format is still pretty useful for intermediate states or quick sketches, but I recommend adding this extension to the .gitignore file in your repository
keywords: "Tutorial Pt. 3"
description: Getting started with scripting.
Part 4
In the last chapter we have created our patch and added modulators and additional sound generators. Now we want to build a custom user interface. For simple interfaces like this one you'll almost get away without writing a single line of Javascript yourself - there are some helper tools which try to do the most boring stuff for you. However please have a look at the generated code. As soon as the interface gets more complicated or you need a more dynamic behaviour, you'll need to go in there manually.
We'll be using a background image and film strips for the sliders. The graphics are kindly provided by Jesus Ginard from Wavesfactory. You can download the image files [here](http://hise.audio/download/tutorial/ImagesTutorial.zip). If you copy them into the Images subfolder of our project, we are ready to start.
Add the Interface Script Processor
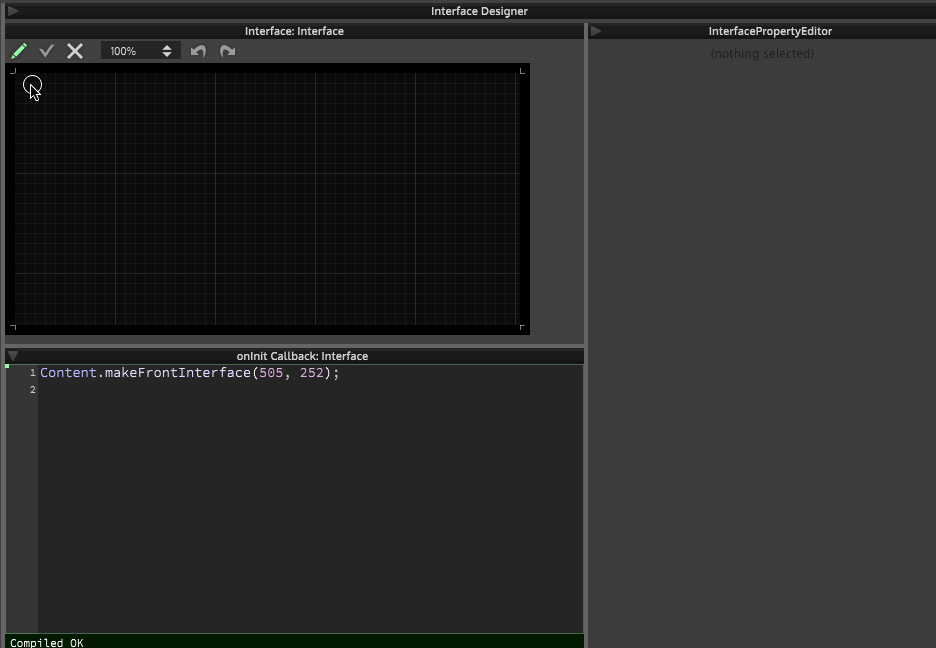
A user interface script is a ScriptProcessor in the **Master Chain** slot which is explicity told to act as interface. Since HISE 1.0, you can create this automatically using the Interface Creation Wizard. Click on the House icon in the main topbar and it will open a popup where you can define the size of your interface. Set it to 505 x 252 and press OK (press OK again to switch to the scripting workspace with the newly created interface).
From now on the House button toggles a window with a preview how the finished plugin will look like. Press it and you should see this:
There's a crowded little toolbar in the top, then a blank black space (which will be our interface later on) and a keyboard on the bottom.
Customize the Toolbar
First let's get rid of some stuff in the toolbar. By default everything is enabled but you can easily deactivate some elements. First let's take a look at each element so we can decide what we wan't.
Element | Property Identifier | Description
- ------ | ------------------- | -----------
CPU Meter / BPM Display / Voice Counter | cpuTempoVoicesShown| Displays the system stats for this instrumentPreset Manager |
presetShown | Shows the preset manager (a drop down menu and the two arrow buttons)Tooltip Bar |
tooltipBarShown | The tooltip bar that shows some help when hovering over controlsMaster Knobs |
knobsShown| Knobs that can control the master tune / pan / gainOutputMeter |
outputMeterShown | A output peak meter
In our example we won't be using any presets, so we don't need the preset manager widget. Also the master knobs will be hidden (so that the tooltip bar is a little bit bigger).
In order to hide elements, you need to create a JSON object and pass it to the method Content.setToolbarProperties(toolbarData). Fortunately, there is a helper function that creates the default behaviour, so just use **Tools -> Create Default Toolbar JSON Definition**. Paste the clipboard content into the
onInit callback and change the properties
presetShown and
knobsShown to
false. Press Compile and enjoy the new shiny toolbar (you might have to close and reopen the preview window after this step).
Customize the keyboard
The colours of each key in the keyboard can be defined separately in order to give the user a hint where the range of the instrument can be found. In our case, the samples are mapped between 50 (D2) and 76
(E4). If you wonder how I got the numbers, just add Console.print(Message.getNoteNumber()) in the
onNoteOn callback and check what are the edges of your mapped range in the console.
Add this code to the onInit Callback:
for(i = 0; i < 127; i++)
{
	if(i >= 50 && i <= 76)
    {
		Engine.setKeyColour(i, 0x22FFFFFF);
    }
    else
    {
    	Engine.setKeyColour(i, 0x77000000);
    }
}

// This centers the range in our plugin window (symmetry is awesome)
Engine.setLowestKeyToDisplay(33);
The format for the colour is best written as hexadecimal number in the format 0xAARRGGBB so you might play around with different colours if you are bored. But go easy on the alpha value or it gets ugly...
Now we're ready to tackle the big black space in the middle.
Create the interface content
We'll be using the fancy new Interface Designer to add the background image and the knobs and buttons. You should see something like this:
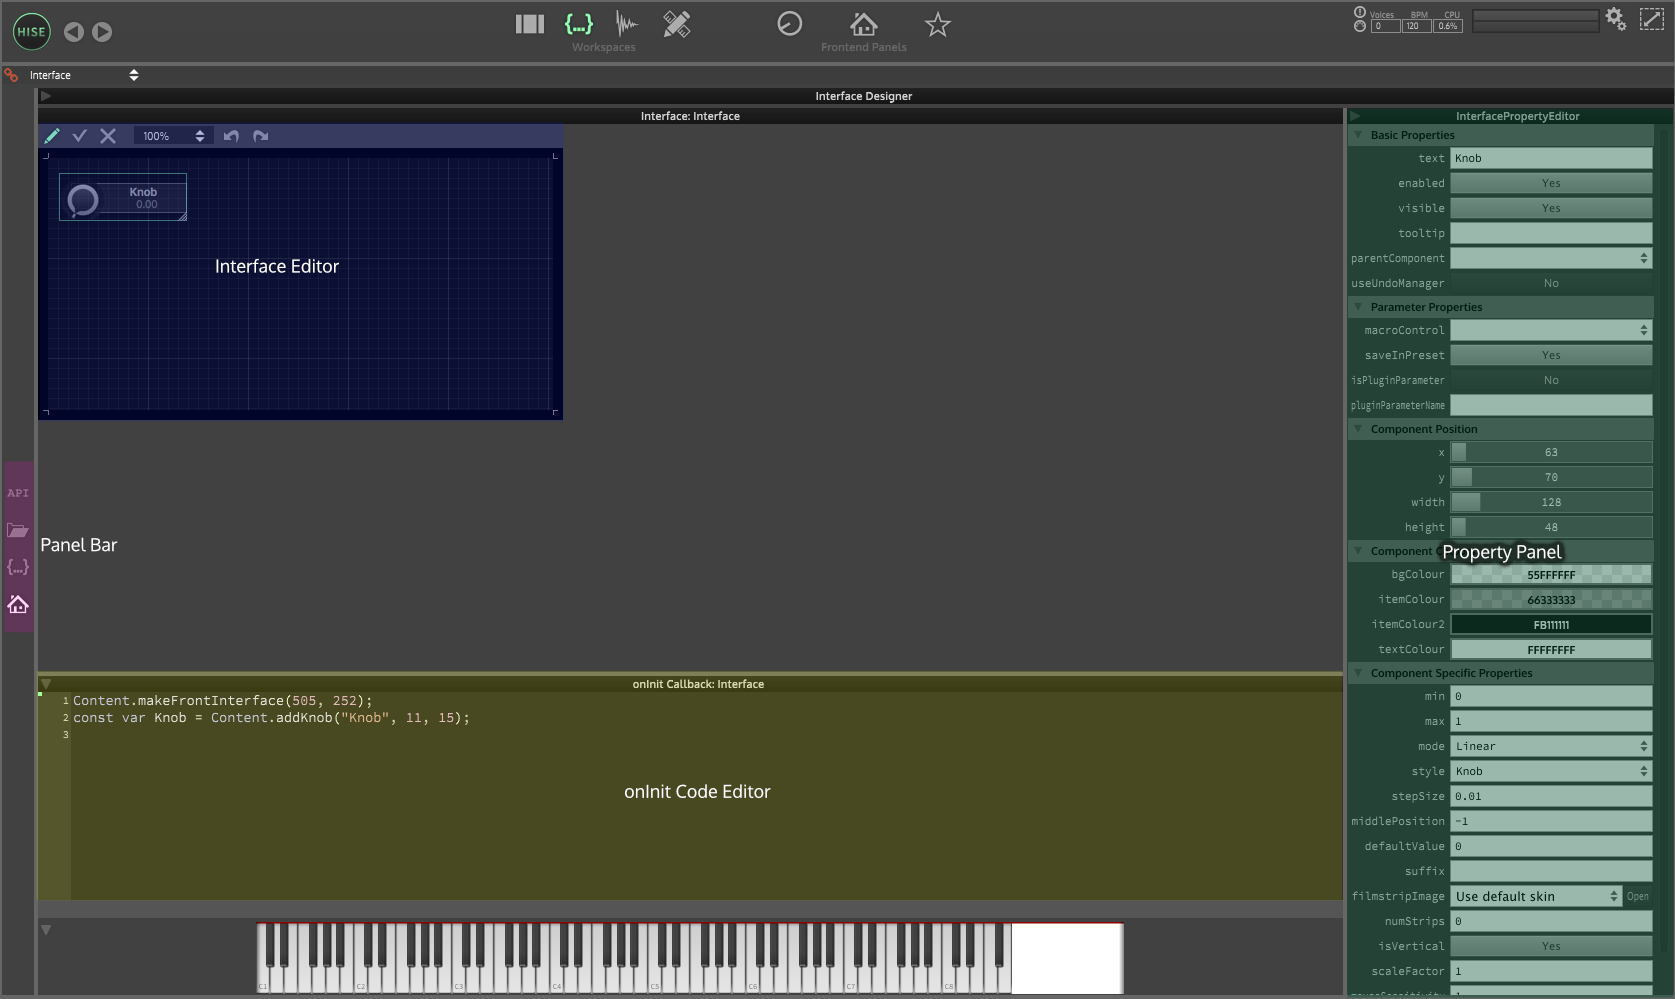
There are four important panels:
Name | Description
- --- | -----------
Panel Bar | Shows / hides different panels. If you don't see something like the screenshot above, this is the place to fix it.Interface Editor | the preview area of the interface.onInit Code Editor | this displays the content of the onInit callback. Whenever you change something in the interface editor, it should update its content so you can see what it's doing (and can step in and add more complex behaviour if desired).Property Panel | If you have selected a control in the editor, this panel allows you to change its properties. Whenever you made changes, the code editor will update its content, however you have to press the OK Button on the interface editor to complete an editing process and apply the changes (this will also recompile the script).
The most important panel is the interface editor. You have a toolbar with a few buttons. The first button toggles the mode of the editor:
- **Edit mode (the pen symbol)**: Create new widgets, drag them around and change their properties
- **Play mode (the lock symbol)**: Test the interface
Now that you're in Edit mode you'll notice the rasterized overlay with 10px measurements. First let's add the background image. Rightclick somewhere on the interface, choose **Add new Image** and give it a name (bgImage would come into mind...). Press OK and you should see a small image without content.
Click on the image (it gets selected and the properties of it show up in the right panel). Drag it to (0,0) (you can see how the code changes as you move it around). Scroll down in the property list and click on the **Open** button of the fileName property. Select the
Background.png file in the dialog and press **OK**. The little placeholder for the image should be replaced with the background image. Press the OK button to save the changes (you are currently in a intermediate stage where the changes you made are withholded from the scripting engine to allow a nicer UX):
If you reopen the preview window now, you'll see something that starts to resemble our final plugin:
Now we'll be adding the knobs and the buttons. There are six knobs with a custom filmstrip and two buttons. Click somewhere and choose **Add new Slider** and call it modWheelAttKnob(a slider and a knob is practically the same thing so please don't get too confused by this).
Click on the Knob, and load the image called knob_128frames.png (by clicking on the **Open** button of the
filmStrip property. Change the
filmstripAmount property to 128 (you might have guessed this one from the filename), the
width to 32px, the
height to 38px and press Compile.
Now select the knob again and move it to the correct position (above the *ModWheel Att.* label). There are some features that assist you with correct positioning:
- Use the arrow keys to move widgets around.
- Use modifier keys to alter the behaviour:
Modifier Key | Action | Behaviour
- -- | --- | ---
Command Key | Mouse Drag & Key Stroke | Enables rastered movement (rounded to multiplies of 10)Shift Key | Mouse Drag | Enables horizontal / vertical only movement / resizingShift Key | Key Stroke | Resize the widgetAlt Key | Mouse Drag | Creates a copy of the currently selected widget (there will also be a plus sign on the widget indicating that it will be copied).
Before we proceed, let's take a look at the code we generated:
const var modWheelAttKnob = Content.addKnob("modWheelAttKnob", 87, 99);
// [JSON modWheelAttKnob]
Content.setPropertiesFromJSON("modWheelAttKnob", {
  "width": 32,
  "height": 38,
  "filmstripImage": "{PROJECT_FOLDER}knob_128frames.png",
  "numStrips": "128"
});
// [/JSON modWheelAttKnob]
The first line is the widget definition (it is strongly recommended to keep the name of the widget and the variable name identical). The rest is the properties of the component as JSON (there are more properties, but it just shows the non default ones to keep the redundancy low).
We could now start duplicating the knob until we have all knobs that we need. However it would copy the JSON list for each knob which creates a huge amount of boilerplate code (for this example it might be OK, but for larger interfaces it gets extremely annoying). But there is a handy solution baked right into HISE:
In almost every interface you'll probably end up with multiple widgets which are basically the same (and only differ in their x/y position). For this kind of widgets I recommend using a factory function, which has at least three parameters:
- Name
- x-position
- y-position
If you rewrite the widget definition as factory method, you'll end up with something like this:
inline function createMusicBoxKnob(name, x, y)
{
	local widget = Content.addKnob(name, x, y);

    Content.setPropertiesFromJSON(name, {
      "width": 32,
      "height": 38,
      "filmstripImage": "{PROJECT_FOLDER}knob_128frames.png",
      "numStrips": "128"
    });

    return widget;
};

const var modWheelAttKnob = createMusicBoxKnob("modWheelAttKnob", 87, 99);
This does not seem to be less code, but from now on, you can add the same knob type with a simple line:
const var clickAttackKnob = createMusicBoxKnob("clickAttackKnob", 127, 99);Now comes the best part: HISE can automatically convert a widget definition plus its JSON properties into a factory method. Select everything you want to move into the factory method (in this case the widget definition line and all JSON code including the comments), and select "Convert to UI factory method" in the context menu. Enter a name for the method (start with createXXX) and it will replace the definition with the lines shown above:
Things get easier from now on. After you successfully positioned the first knob, you can simply duplicate the knob and move it around horizontally by holding both the **Alt** and the **Shift** key (notice the + symbol while dragging. Add the other knobs and use these names (so we don't mix things up later):
- clickAttackKnob
- reverbAmountKnob
- reverbSizeKnob
- reverbColourKnob
- reverbPreDelayKnob
It detects automatically if the original knob was created using a factory method and uses the same method for the new definition (or copies the JSON data if it was defined the standard way):
const var modWheelAttKnob = createMusicBoxKnob("modWheelAttKnob", 87, 99);
const var clickAttackKnob = createMusicBoxKnob("clickAttackKnob", 212, 99);
const var reverbAmountKnob = createMusicBoxKnob("reverbAmountKnob", 345, 99);
const var reverbSizeKnob = createMusicBoxKnob("reverbSizeKnob", 419, 99);
const var reverbColourKnob = createMusicBoxKnob("reverbColourKnob", 419, 174);
const var predelayKnob = createMusicBoxKnob("predelayKnob", 344, 174);
Now we just need to add the two buttons and then we can proceed to connecting the interface to the instrument and conclude this chapter. You should be able to do without further guidance. The filmstrip images for the releaseTriggerButton is called
onOffSwitch.png and the image for the
noteOffButton is the
switch.png image. The size of the buttons is
43 x 22 px.
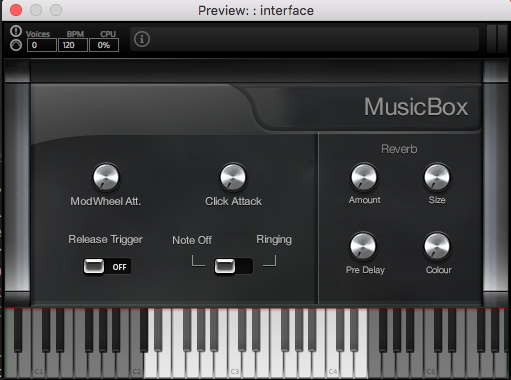
If your interface looks like this, you are ready to proceed:
Cleaning up...
You might want to add some empty lines to structure the code a little bit. And you can insert **Code Bookmarks** by adding a line like this:
//! ============ [...] ====== Bookmark TitleAn exlamation mark after the comment slashes tells the parser to treat that line as bookmarks (characters like = or
- will be stripped from the bookmark title). This allows you to quickly jump between locations in the code (All bookmarks are listed in the editor's context menu after compilation).
Bonus Level: Tooltips
You can add tooltips pretty easily which will be displayed when you hover over a widget. Select each widget and insert a descriptive text into the tooltip property field:
Widget | Tooltip
- ----- | -------
modWheelAttKnob | Dampens the velocity according to the modwheel position
clickAttackKnob | Controls the volume of the click noise
reverbAmountKnob | Controls the reverb amount
reverbSizeKnob | Controls the room size of the reverb
reverbColourKnob | Controls the timbre of the reverb
reverbPreDelayKnob | Controls the predelay of the reverb
releaseTriggerButton | Enables a muted ring off sound
noteOffButton | Lets the note ring off naturally (ignores note offs)
If you are not the click and scroll type, you could also use this javascript code to achieve the same thing (this would be an example where its faster to do this manually):
//! ============================================================================== Tooltips

modWheelAttKnob.set("tooltip", "Dampens the velocity according to the modwheel position");
clickAttackKnob.set("tooltip", "Controls the volume of the click noise");
reverbAmountKnob.set("tooltip", "Controls the reverb amount");
reverbSizeKnob.set("tooltip", "Controls the room size of the reverb");
reverbColourKnob.set("tooltip", "Controls the timbre of the reverb");
reverbPreDelayKnob.set("tooltip", "Controls the predelay of the reverb");
releaseTriggerButton.set("tooltip", "Enables a muted ring off sound");
noteOffButton.set("tooltip", "Lets the note ring off naturally (ignores note offs)");
Connecting the parameters
Until now the interface is a pretty but useless thingy so we need to connect the controls to parameters within the patch.
For a detailed description of the parameter system in HISE take a look at this blog entry
For our little example we can use the **Parameter Connection Wizard** that automatically creates the code for us. Let's start with the reverb knobs. Change to **Edit Mode**, right click the reverbAmountKnob and select **Connect to Module Parameter**. Select the
ReverbSendGain module and the
Gain parameter and press OK. There will be two new things added to the script:
**1. The variable definition for the reverb module in the onInit callback:**
javascriptconst var ReverbSendGain = Synth.getEffect("ReverbSendGain");
This creates a connection to the module in the patch. It searches the entire tree and returns the first element with this name, so make sure you don't use names twice if you want to access them via scripting.
**2. A switch statement in the onControl callback**:
switch(number)
	{
		case reverbAmountKnob:
		{
			ReverbSendGain.setAttribute(ReverbSendGain.Gain, value);
			break;
		}
	};
If you move the knob, it should now change the gain parameter. However, it just moves between 0dB and 1dB (because the slider has a default range of 0...1). So you'll need to change the slider's range by inserting these lines after its definition. Normally we could simply change the JSON properties, but since we replaced the JSON definition with the factory method, we'll need to change this manually (this is the tradeoff we have to take):
reverbAmountKnob.setRange(-100, 0, 0.1);
reverbAmountKnob.setMidPoint(-12.0);
Proceed with the other sliders. Apart from the predelaySlider all parameters should happily accept the default
0...1 range. But you might want to change the mid point of the click attack slider to
0.25 (which is -12dB as gain factor).
Now the buttons. The "Release Trigger" button will toggle the sine generator. We could turn down the volume to zero by using the Gain parameter, but there is a more elegant solution: Add a MIDI muter to the Sine Generator and use its "Ignore all events" parameter to bypass the sine generator without clicks. You'll need to invert the behaviour for this button by changing this line in the onControl callback:
MuteRingOff.setAttribute(MuteRingOff.ScriptedParameters.ignoreButton, value);Just insert a ! before
value and it should use the inverted value.
The other button changes the note off behaviour (if set to ringing, it'll ignore the note off message and the sample can fully decay). This can be achieved by using the OneShot property of the sampler module.
Thats it. The interface is fully functional and the instrument is ready to be exported as VST / AU plugin, which will be the last chapter of this tutorial.
Part 5
User Settings
Here you can enter your company's name, website and a "Company Code" which is used by AU plugins. This needs to be four characters with the first one being uppercase (eg. Myco
), otherwise the auval
tool will fail and you won't be able to load your plugin into Logic or Garageband.
The Company name will be used for the application data folder, so it must be a valid folder name.
Project Settings
Now we can setup the last page (File -> Settings -> Project Settings ).
- The Project name will be the plugin name. It will store the user presets under
APP_DATA/Company Name/Plugin Name/so make sure it's a valid file name. - The project version will be embedded into the plugin binary and can be used by installers to check if it needs to be overwritten. It's important to use semantic versioning (eg. 1.0.5) as this will get validated during export.
- the 4 character code needs to be in the same format as the company code (
Abcd) - If you have loaded impulse responses, you might choose to Embed Audio files into plugin . Since we don't have any audio files (samples are treated differently anyway), we don't need to bother about this option.
- The last two properties can be used to add additional C++ classes, but we'll leave this empty for out beginners tutorial.
3. Export to VST / AU
That's it. Now you should be ready to compile the plugin. Open the saved patch and choose File -> Export -> Export as Instrument (VSTi / AUi) . If you are on Windows, you can choose, which platforms you want to compile (x86 / x64 / both). Press OK and go get a coffee while the compiler is doing the hard work (it should pop up a terminal window for a few minutes and spit out cryptic stuff that makes you feel like you're in the matrix).
IMPORTANT: The plugins you'll create are automatically licenced under the GPL v3 licence. This means you can't distribute them without releasing the source (which would be the entire project folder). For commercial usage, there is a separate license model available. Please get in touch to discuss further details. mail @ info@hise.audio
4. Deploy the plugin
Once the digital dust has settled (which will take a few minutes), you'll find your compiled plugins in the subfolder Binaries/Compiled
of the project.
All sample maps, scripts, images, factory user presets and impulse responses are embedded into the plugins binary. However the samples must be stored separately so that they can be streamed. Also the sample size quickly exceeds a reasonable binary size so it would be impractical anyways.
Since we converted the musicbox samples to a monolithic file, you also need to distribute the "Musicbox.ch1" file from the projects sample folder (converting a sample set to a monolithic file also prevents using the samples outside of the plugin, because there is no metadata).
The plugin data folder
Because of this reason, the plugin requires a folder in the users app data directory which contains a link file to the sample location (the user should be able to relocate the samples). On Windows this folder will be at:
C:/Users/YOURNAME/AppData/Roaming/Company Name/Project Name/
On OS X you can find it here:
/Users/YOURNAME/Library/Application Support/Company Name/Project Name/
The folder will contain these files:
- The link file for the sample called
LinkOSXorLinkWindowswhich is a simple text file containing the path to the sample folder (a poor mans symlink) - Persistent audio settings for the standalone application called "DeviceSettings.xml"
- A folder with User Presets. This folder contains ".preset" files (but we don't need presets for our musicbox yet).
On first launch, the plugin will create this folder (if it doesn't exist yet) and asks for the sample location. Then you'll need to reload it (because it only loads the samples once). If you want to increase the UX experience, I'd recommend that you create these files automatically with an installer.